Advertisement

Saturday, June 10, 2017

Skytorrents: A non - Tracking, and Ad free Torrent Site.

Skytorrents: A non - Tracking, and Ad free Torrent Site.

All of you know about torrent websites. These sites provide tones of free content that violate copyrights. As soon as you click anywhere on the website or in the search bar, the website opens up a new ad page in the background often frustrating users. Likewise, many other smaller proxies and torrent websites go on to launch survey ads which often contain adware.
All these sites depend on the online advertisement for their revenue and operation. And Often, we also become the target to malicious popups. You will find any torrent sites rarely (or may be not) which has no ads.

What If any torrent websites will say to you that they will never show any ads and always respect your privacy? Of course all of you will pay a visit to that type of site.

I am talking here about SkytorrentsFew month ago, a new website launched in the world of torrent. This Website promises that they do not track its users and promises to deliver an ad-free torrenting experience.

Setting up a torrent site without ads isn’t hard, but the privacy element is trickier. To achieve this Skytorrents has had to make a lot of concessions, both in design and the general functioning of the site.

For respecting the privacy of the users, Skytorrents users don’t have to create any account. Also, the website doesn’t use JavaScript at all. Skytorrents also doesn’t use any CDN which often stores the end-users data. “For example, using a CDN breaches user privacy. As far as complete privacy is concerned, either there is complete privacy or zero privacy. For maintaining complete privacy, we do not use cookies, java scripts or user logins. We also do not have any moderators,” says Skytorrents team member.

According to TorrentFreak, Skytorrents’ operator said that, “We will NEVER place any ads. The site will remain ad-free or it will shut down. When our funds dry up, we will go for donations. We can also handover to someone with similar intent, interests, and the goal of a private and ad-free world.”

Also, there’s a separate tool for confirming genuine torrents. The website operator says that about 99.99% torrents are genuine. TorrentFreak writes that at the moment about 13,000,000 torrents are listed, and it’s continuously expanding.

The overall website looks clean and uses the spam detection algorithms to scan all listed torrents. Skytorrents website is a refreshing change over the ad-based torrent websites. The UI is simple yet interactive with a powerful search engine that throws up best torrent download results in a matter of seconds. The website runs on a CentOS operated server and has been created without PHP or MySQL.

It’ll be interesting to see whether they will be able to pull this off or able to keep their promise of an ad-free and privacy-focused website in future.


So, that's all about The newly launched website Skytorrents. Is there anything that we missed? Tell us in comment section. And do share with others too and let them also know.

Friday, June 9, 2017

Smart TVs can be Hacked just by using Broadcasting Signal

Smart TVs can be Hacked just by using Broadcasting Signal.
Smart TVs can be Hacked just by using Broadcasting Signal
Image Source: 123rf

A Security Researcher warns about a new attack that uses rogue DVB-T (Digital Video Broadcasting — Terrestrial) to hack a wide range of Smart TVs. The Hackers are able to take complete control of a large number of sets at once without having any physical access to any of them.

Even the Hacking tool developed by CIA named "Weeping Angel," which could take over Samsung smart TVs and turn them into spying devices. But this Tool by CIA needed physical access to install Weeping Angel, which made it less likely to be used in mass attacks, and was only feasible if deployed on one target at a time, during carefully-planned operations.

The proof-of-concept exploit for the attack, developed by Rafael Scheel, a security researcher working for Swiss cyber security consulting company Oneconsult, uses a low-cost transmitter for embedding malicious commands into a rogue DVB-T (Digital Video Broadcasting — Terrestrial) signals. 

Scheel says that anyone can set up a custom DVB-T transmitter with equipment priced between $50-$150, and start broadcasting a DVB-T signal.
Smart TVs can be Hacked just by using Broadcasting Signal
Image Source: OneConsult

That signal is then broadcast to nearby devices. It worked against two fully updated TV models made by Samsung. By exploiting two known security flaws in the Web browsers running in the background, and once compromised, attackers could remotely connect to the TV over the Internet using interfaces, allowing them to take complete control of the device.

Once compromised, the TV would be infected in a way that neither device reboots nor factory resets would help the victims get rid of the infection. The attack was able to gain highly privileged root access to the TVs and use the device for all sorts of nasty actions, ranging from DDoS attacks to spying users.

Scheel provided a live hacking demonstration of the attack during a presentation at the European Broadcasting Union (EBU) Media Cyber Security Seminar, saying about 90 percent of the Smart TVs sold in the last years are potential victims of similar attacks.

At the center of Scheel's attack is Hybrid Broadcast Broadband TV (HbbTV), an industry standard supported by most cable providers and smart TV makers that "harmonizes" classic broadcast, IPTV, and broadband delivery systems. TV transmission signal technologies like DVB-T, DVB-C, or IPTV all support HbbTV.

Below you can watch the video of his presentation, which also includes demonstrations for both DVB-T attacks and proposed mitigations :


"Once a hacker has control over the TV of an end user, he can harm the user in a variety of ways," Rafael Scheel, the security consultant who publicly demonstrated the attack, told Ars. "Among many others, the TV could be used to attack further devices in the home network or to spy on the user with the TV's camera and microphone."

Best feature of this  attack is that this Attack is Fully Untraceable, the reason behind this is the DVB-T, the transmission method for HbbTV commands, is a uni-directional signal, meaning data flows from the attacker to the victim only. This makes the attack traceable only if the attacker is caught transmitting the rogue HbbTV signal in real-time. According to Scheel, an attacker can activate his HbbTV transmitter for one minute, deliver the exploit, and then shut it off for good.

It's almost impossible to get rid of infected smart TVs, any backdoors added through this method are almost impossible to remove, as the attacker could sabotage any firmware update mechanism and remain on the device until users got rid of their smart TVs. Furthermore, Scheel says even factory reset operations didn't help for the devices he tested, and the backdoor he developed remained on the TVs.

The researcher says that such a backdoor could be used to run IoT DDoS botnets, use the smart TVs as relay points for attacks on enterprise networks, spy on users via the TV's microphone and camera, steal data stored on the TV, inject ads on the TV (sabotage competitors on the smart TV market), and many other actions.

Once again this hacks underlines the risks of so-called "Internet of Things" devices, the vast majority of which are given network access and computing functionalities without being adequately secured. TVs and other Internet-connected appliances almost universally lack application sandboxing and other exploit mitigations that are a standard part of computer and mobile operating systems. Even worse, most devices run old versions of Linux and open source browsers that contain critical vulnerabilities. While patches are generally available on the Internet for the individual components, manufacturers rarely give customers a way to install them on the devices in a timely way.

Since the IoT devices are rapidly growing and changing the way we use technology, it drastically expands the attack surface, and when viewed from the vantage point of information security, IoT can be frightening.

Due to the insecure implementation, a majority of Internet-connected embedded devices, including Smart TVs, Refrigerators, Microwaves, Security Cameras, and printers, are routinely being hacked and used as weapons in cyber attacks.

So, is there anything to say about this Smart TVs Hacking, Tell us your views in the comment section below. And do share with others too.

Source: OneConsult

Tuesday, June 6, 2017

How To Create Your Own Falling Matrix Effect In Windows PC

How To Create Your Own Falling Matrix Effect In Windows PC?
How To Create Your Own Falling Matrix Effect In Windows PC
Image Source: Pixabay


I think Everybody Loves the "Green Falling Effects" the visual effect of the falling binary code known as "Rain" in The Movie Named Matrix. Whenever I see the Matrix movie, I wonder how do the operator see objects through that "Green random code"

I know how to create a similar screen with green random numbers falling. You can also create it very easily with a simple batch file. May be you want to create a falling matrix to impress your friends, Or maybe you want to record it and turn it into a sweet video intro, or a screensaver! 

Today I will show you how you can create falling Matrix effect. The falling matrix effect is extremely easy to do with simple Batch File in notepad , and the resulting Visual Effect is fantastic! So, here’s how to make the falling matrix code in notepad.

Step 1 : First open Notepad.

Step 2 : Copy the code below and paste it in your notepad.


Step 3 : Click on "File" and then select  "Save As" option. Now save your file with a ".bat" extension i.e like "Matrix.bat".

Step 4 : Now simply close the file and go to the location where you saved the file.

Step 5 : Run the "Matrix.bat" file that you saved, as an administrator.

Now, you will see Falling Matrix effect (random green code) being generated on the screen.


How to stop the Batch File code?

Just press ctrl +C while the program is running. This stops the program and asks you if you want to quit the program. Press Y to exit.


Description, Why this Happens?

Here we saved the file with a '.bat' extension which stands for "batch" file .When a batch file is run, the shell program which is usually a Command Prompt or cmd.exe reads the file and executes its commands line-by-line.

Here in the code we are just printing random numbers which are generated by the line %random which generates random numbers. By using a lot of random variables we are generating the scrolling effect. 


If your screen doesn’t get filled with code horizontally, just paste more of those  %random variables in the code.
The line color 02 tells the computer to select green color. As from RGB Where if you want Red color change code to 04, if you want blue color change it to 01.


So, by this way you can Create your own Falling Matrix Effect in Command Prompt in Windows PC. Create your own matrix effect and Enjoy. Do Comment below if You faces any problem and Do share with your friends and let them know too.

Monday, May 29, 2017

How To Access your Computer Remotely with Chrome.

How To Access your Computer Remotely with Chrome.

Image source: ShutterStock
To remotely access a computer over the internet, there are many applications available. Many of you might have already used applications like TeamViewer and helped your friends and family. VNC is another application that allows you to install a VNC server on a computer you wish to access remotely.
Most of us must be having Google Chrome browser installed on our computer. For remote access, you just need to install a Chrome browser extension named Chrome Remote Desktop, and then you are good to go.

Using Chrome Remote Desktop, which is a Chrome extension, you can easily access your computer remotely. You can do so via desktop PCs, laptops, or smartphones. It does not matter whether you’re using Windows or OS X, Linux, or Chromebook, all you need is the Chrome Remote Desktop extension. This extension can act as a great alternative to Team Viewer and VNC. 

What we need before using Chrome Remote Desktop for remotely accessing computer: 
1. To use Chrome Remote Desktop, you need to have a Google email account. 
2. The supported operating systems are Windows, Mac, Linux and Chromebook. 
3. We need to install the extension on both the computer which we want to be able to used remotely and any machines which we want to be able to use to dial in. Start with the machine you want to be able to control.

This is actually a large extension, weighing in at about 22.6 MB, but it will install very quickly nonetheless. Once installed, click New Tab and you can access the remote access tool from the list of installed apps. So, read thorough article to know about how you can use chrome to access PC remotely.


How To Remotely Access PC Using Chrome Remote Desktop:

Step 1: Download and Add Chrome Remote Desktop Extension, to your chrome browser. To do so, sign in into your Google Account. Now, on your Chrome web browser visit this link on Chrome App Store to get the Chrome Remote Desktop app.

Step 2: Launch the Chrome Remote Desktop app for remotely accessing your computer. Once the app will get installed, you’ll see the Add to Chrome button has changed to Launch App button. You can alternatively type the URL chrome://apps/ in your address bar and find the installed Chrome apps.
How To Access your Computer Remotely with Chrome.
Step 3: The first time you launch Chrome Remote Desktop, you’ll need to grant it permission to access your computer. Click Continue, make sure that you are signed into your Google account, and then click ‘Allow access’.

There are two Options to use this Chrome app — The first option is to allow someone else to access your PC, and the second option is for accessing your computer from anywhere. 
How To Access your Computer Remotely with Chrome.

Option 1: If you want to Access your computer Remotely, Click the ‘Get started’ button in the My Computers section. And then Click the ‘Enable remote connections’ button.

Option 2: If you want Remote Assistant to Share your screen remotely, Click ‘Get started’ button in Remote Assistace Section. And then click Share button.

Step 4: As a security measure, you will need to choose a PIN to protect your computer, so enter and confirm a code that is at least six digits in length and then click OK.
How To Access your Computer Remotely with Chrome.

Step 5: You will also need to permit the User Account Control dialog box that appears. Once this is done, re-enter your PIN and click Confirm, then OK.

Step 6: After entering the PIN, the remote access will be enabled.
How To Access your Computer Remotely with Chrome.

You can use a computer or Smartphones to access your files and applications over the Internet with Chrome Remote Desktop. For Users` Security all remote desktop sessions are fully encrypted.
To disable the remote access, you simply need to click on the Stop Sharing button.

You can Also use Chrome Remote Desktop on Linux OS, if you are using Chrome. All processes can be found on chrome support help page or you can go to this link.
On this page you will also find process of using Chrome Remote Desktop on your iPad, iPhone Mac and on your Chromebook. 


So, this post was on How To Access your Computer Remotely with Chrome. Hope you liked this article.Leave a comment below if you face any problem, and share with others and let them know too.

Source:google support page

Thursday, May 25, 2017

How to put Multiple OS in a single USB (MultiBoot USB)

How to put Multiple OS in a single USB (MultiBoot USB)

How to put Multiple OS in a single USB (MultiBoot USB)


Almost all operating systems made it very easy to put ISO files on USB drives by using various tools. For example, the Windows USB/DVD tool and the Startup Disk Creator in Ubuntu.

You can’t waste your each single USB drives for each single OS for creating a Bootable USB Drive. Now, there are many OS available in the market, either free or paid. Each having its multiple versions and features. It would be great if you put all the ISO files on one flash drive and take the advantage of installing multiple operating systems through a multiboot USB drive.

So, in this article, I am gonna tell you how you can put multiple OS in a single USB Drive and create a multiboot USB pendrive. Since most ISOs have heavy amount of size, your flash drive must be at least 16GB or 32GB capacity. Like, If you want to put three Windows ISOs in the multiboot USB disk, you will need a 16GB flash drive.

The process to create a multiboot USB drive is quite simple. For Windows OS, these multiboot USB drives can be created using a popular tool known as WinSetupFromUSB. It allows you put multiple OS ISOs in one USB drive. You can put Windows and Linux in a same bootable disk or create a master installation disk of Windows 7, Windows 8.1, and Windows 10. The choice is yours. So, Lets see How To Create Multiboot USB Drive.

How To Create Multiboot USB Drive:

Step 1: Download WinSetupFromUSB and Extract the software.
Step 2: Connect your USB drive to your computer.
Step 3: Open WinSetupFromUSB.(Open the 32 and 64-bit version according to your OS.) 
Step 4: Select your USB stick from the drop down menu. If the software doesn’t recognise your pen drive, press refresh.
Step 5: Tick Auto format it with FBinst. Remember you have to choose this option only during the first ISO installation.
How to put Multiple OS in a single USB (MultiBoot USB)

Step 6: Click Advanced options.

Step 7: Tick the Custom menu names for Vista/7/8/Server Source checkbox. Now exit Advanced Options.
How to put Multiple OS in a single USB (MultiBoot USB)
Step 8: Now you have the main screen of the tool, from here select the checkbox of the OS which you want to install on your USB drive. 
Note: If the size of your ISO is larger than 4 Gb, it will show a message to split the file into parts. This is because you’ve chosen the FAT32 option. Click OK.

Step 9: Click GO. A data deletion warning message will be displayed. This is because you’ve chosen to format the flash drive. Click Yes.
Step 10: The software will now format your pen drive and install the ISO that you have selected. The process will take few minutes to finish.


How to add the next OS in that USB Drive:

  • Start the WinSetupFromUSB tool again.
  • Select your flash drive in the drop down menu.
  • Click Advanced Options and look for Custom menu names for Vista/7/8/10/Server Source.
  • During second ISO installation, kindly uncheck Auto format with FBinst. Enabling this will remove your previous ISO file.
  • Click GO and follow the same process.
Note: WinSetupFromUSB doesn’t support different versions of  ISOs i.e. it can’t have 32-bit and 64bit version in a single USB drive. It will show an error message.

If you want to add more OS in your USB drive then Follow the same process to add ISOs to your USB Drive and to make your USB drive multiboot.

There are some more Softwares available which could help you to create Multiboot USB drive. The Methods of creating Multiboot from these Software are explained in details on their websites. You may also want to give a try to these softwares: 

  1. You can also use YUMI – Multiboot USB Creator to create Multiboot USB.
  2. Another tool for creating Multiboot USB Drive is XBOOT – Multiboot ISO USB Creator.
  3. One more software which is best known for creating Multiboot USB drives is SARDU – Multiboot USB Creator.


So, this was the method to create a Multiboot USB drive which will allows you to choose between multiple operating systems at a time of installing.
Hope you like this article. Comment below, if you faces any problem. Do share with others and let them know too.


Thursday, May 18, 2017

How To Install Windows OS In 10 minutes

How To Install Windows OS In 10 minutes.
How To Install Windows OS In 10 minutes

Installation of Windows OS takes lot of time. We all have to spend so much time when formatting our windows PC. We are obliged because of windows installation speed. But we can speed the installation of windows OS using simple commands. 

This Time, I will explain How to Install windows OS In Just 10 minutes. This is a simple tweak and some people know about it but many people still not aware of it. This tweak is extremely helpful for people who are still relying on that time of installation of windows OS.


As we all know that during formatting a Computer, after the file copying is completed, Windows require approximately 30-40 Minutes Time. But, from this tweak we can bypass windows installation time. 

If you are wondering how this is possible then read these simple steps.


How to Install windows in 10 Minutes?

Step 1: Once the copying part is completed, as we all know in general windows Installation Procedure the system will restart.

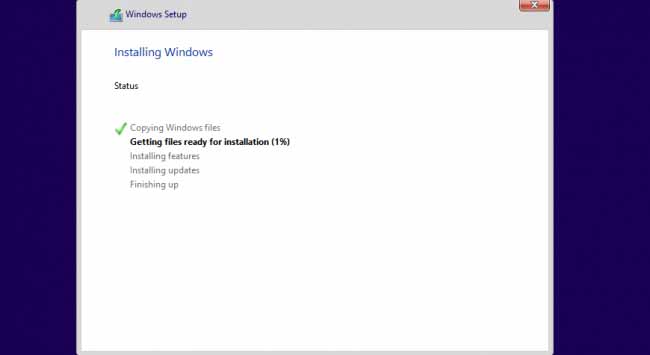
Now when the system will be Restarted, the image like below will appear (In windows 10 screen will be appear as below image).
How To Install Windows OS In 10 minutes


Step 2: Now when this image appears, you have to press “Shift + F10 ” . This will open the command prompt. Now type taskmgr in it. This will open the Task manager.
How To Install Windows OS In 10 minutes


Step 3: After The task Manager Opens Go to Processes. And Find “Setup.exe” process and Right CLICK on It. and set the Priority to Realtime or Above Normal.


STEP 4: Now Just  Wait and Watch the Setup. It will take around 9 minutes and 2 minutes for Tolerance (depends on System).


So, When you Format or Install windows on your PC Next Time It will Really Save Your Time around 20 to 25 minutes.

That’s It.You Can Use this method in Windows xp,7, 8 And 10.
Hope you like this article. Comment below in Comment section if you encounter any problem. Share with others and let them know too.


Best Search Engines to Perform Online Face recognition.

Best Search Engines to Perform Online Face recognition.
Image: Shutterstock

Everyone might be quite familiar with other search engines where the usual text or word have to be included, and the results come on the screen, but most probably people do not know about the advanced search engine that could also locate any person’s data on the internet. One of them is Facial Recognition search engine. 

You could use these advanced search engines to locate the people around the world having the similar face like you, use it to find yourself in a group photo, etc. all. Here in this article, I am telling you about all those best facial recognition search engines. Note that the common search engines like Google search, Bing, etc. cannot be used in their regular ways for the facial recognition searches but for that, you would need to go with the alternate search engines. Now just follow the article to know about those best facial search engines.


Let’s have a look on Best Search Engines to Perform Online Face recognition that you will surely love to use as they will provide you complete details of the person whose photo you will upload.


Best Search Engines to Perform Online Face recognition.
Below are the best online tools that will help you in recognizing the faces.

1.) Google Image Search:
Best Search Engines to Perform Online Face recognition.

Google definitely has the largest image database, so this should be your first place to find similar faces online. Google Image search doesn’t use Facial Recognition technology, but its algorithms are quite accurate and can show up pleasing results. You may already know about Google Reverse Image Search technology that lets you search the web using picture. However, did you know that you can also limit that search to just face to find similar faces?

For using the Google Face Recognition:

➤Go to the Google image search page
➤Click on the little camera icon. Upload your photo which you would like to search for and then click on the search button.
➤To refine your searched results to only with face type in “&imgtype=face” in the search bar and then hit enter.

2.) TinEye:
Best Search Engines to Perform Online Face recognition.

Tiny eye is reverse image search engine. This search engine searches Images on computer vision, pattern recognition, neural networks and machine learning. 

You can search images by uploading an image, or searching by URL. You can also simply drag and drop your images to start your search. TinEye constantly crawls the web and adds images to its index. Today, the TinEye index is over 18 billion images.


The TinEye also provides browser extension for Firefox, Safari, Opera, Chrome and Internet Explorer. Their extensions allow you to search for any web image by simply right-clicking on images in a web browser.  

3.) Pictriev:
Best Search Engines to Perform Online Face recognition.

Pictriev is a facial recognition search website that tells you basic information about you by scanning your face and also shows you all the celebrities who look like the person in the picture. This is a fun tool which recognizes the face in any photo and then tells about some information regarding the image like with which celebrity the image in the photo looks like etc.

So what you have to do is upload a portrait shot or any face photo in .jpg or .jpeg format, with a size no larger than 200KB, and the search engine will return matching images found online. You can also run a demo with a selection of famous photos.

4.) PicWiser:
Best Search Engines to Perform Online Face recognition.

With this, you could either search for the similar faces or just match up two faces through the photos. This online tool uses the real face recognition technology to search for the similar images throughout the whole database of Google images, other websites, etc.

PicWiser tool can also be used for designers and developers to ensure their pictures are not being used anywhere else without their consent. They use many different official databases to search for the copy of your image and report it back to you, similar to what Google Reverse Image Search does.

5.) BetaFace:
Best Search Engines to Perform Online Face recognition.

Betaface is actually a professional face recognition software for media related companies that helps automatically detect faces and keen details about it.
This, one is the paid service but is totally advanced face recognition tool available out yet.

Through this, the users could upload the photo and then get up the similar images for that while the app also provides some greatly useful information like gender, age, mustaches color, hair shape, chin size, etc. If you are looking forward to getting the possible information for some face, then BetaFace could be the best option to go for.

6.) Kuznech Face Detection:
Best Search Engines to Perform Online Face recognition.

This search engine is really very fast at recognizing the face and after that, the results are also provided quickly. This service would definitely be the best when it would be launched in its full version.

This facial search engine is still under development, and till now it is having only 50 celebrities database. 


7.) TwinsOrNot.net:
Best Search Engines to Perform Online Face recognition.

TwinsOrNot.net is actually a face comparison tool that will let you upload two similar photos and then compare them to see how much similar they are. It uses a percentage to tell how much two faces resemble and to be true, the software is quite accurate as well.

This is a great tool, just upload any two different face photos and then start up the processing of the tool.This could be either fun to compare the similarities of your face with others while this could be used for some purpose too.


So, above all are image search engines. You can use any of them if you want to search Images of any persons.May be you want to recognize them or or may be you want to find them in online world.

Comment below in comment section if you have any difficulties. Share with others and let them know too.